Cara Install dan Running Multi PHP ( Ver. 7.4 dan 8.2) serta Apache Di AlmaLinux 9
Apache memiliki fitur virtualhost yang dapat mengatur multi domain dan virtual direktorinya. Dengan PHP-FPM atau FastCGI Process Manager yang menjadi daemon yang mengatur multi php yang sedang berjalan. Memungkinkan penggunaan php versi yang berbeda sesuai kebutuhan.
Artikel berikut ini akan mempraktekan instalasi dan menjalan multi php dalam satu instance dimana ada dua domain yang menjalanakan dua versi php yang berbeda php versi 7.4 dan 8.2
Tambahkan repository remi
Base repo tidak hanya menyediakan veri terbaru jadi untuk mendapatkan tambahkan repository tambahan REMI.
dnf install https://rpms.remirepo.net/enterprise/remi-release-9.rpmUpdate list cache repository.
# dnf makecache
Check list Module php yang tersedia di repolist dengan perintah dibawah ini.
# dnf module list php
Install versi php 7.4
Reset konfig module, lalu enable list repo php 7.4 dan lakukan instalasi bisa menggunakan perintah dibawah ini.
# dnf module reset php
# dnf module enable php:remi-7.4
# dnf install php74 php74-php-fpm -y
check versi php74 apakah sudah sukses terinstall.
# php74 -v[root@alma9 ~]# php -v
PHP 7.4.33 (cli) (built: Aug 1 2023 08:37:19) ( NTS )
Copyright (c) The PHP Group
Zend Engine v3.4.0, Copyright (c) Zend Technologies
Instalasi php 8.2
Sama dengan tahap instalasi sebelumnya, tetapi dirubah repo yang dipilih untuk di enable adakah php-8.2. Untk melakukannya gunakan perintah dibawah ini.
# dnf module reset php -y
# dnf module enable php:remi-8.2 -y
# dnf install php82 php82-php-fpm -y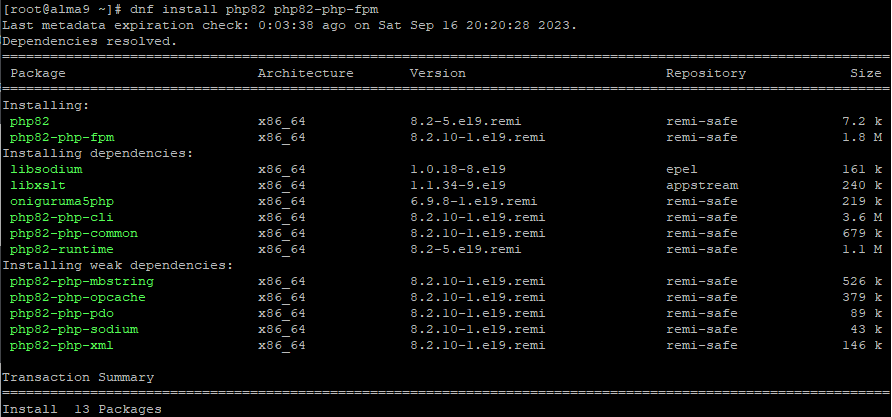
Aktifkan kedua versi php 7.4 dan 8.2 di systemd
Start fpm masing-masing versi php-fpm lalu enable di systemd agar aktif saat system di boot. Gunakan perintah dibawah ini.
# systemctl start php74-php-fpm
# systemctl enable php74-php-fpm
# systemctl start php82-php-fpm
# systemctl enable php82-php-fpm
Cek status masing-masing fpm apakah sudah berjalan di systemd, pastikan dalam status active.
# systemctl status php74-php-fpm
# systemctl status php82-php-fpm
Sampai disini kedua php sudah aktif.
Konfigurasi Virtual Host Apache
Lanjut ke konfigurasi VirtualHost apache. Contoh dibawah ini akan menggunakan domain sobit-one.com dan sobit-two.com yang mememiliki direktori yang terpisah.
Buat direktori untuk masing-masing domain.
# mkdir /var/www/sobit-one.com
# mkdir /var/www/sobit-two.com
Buatkan file info.php yang berisi script di direktori /var/www/sobit-one.com/. Isi file bisa dilihat dibawah ini
# vi /var/www/sobit-one.com/info.php
<?php
phpinfo();
?>
### tekan key :wq untuk save
Salin file info.php ke direktori /var/www/sobit-two.com/
# cp /var/www/sobit-one.com/info.php /var/www/sobit-two.com/info.phpUbah permission direktori ke user dan group apache untuk standard pemakaian.
# chown -R apache:apache /var/www/sobit-one.com
# chown -R apache:apache /var/www/sobit-two.com
# chmod -R 755 /var/www/sobit-one.com/d -R 755 /var/www/sobit-two.com
Buat file konfigurasi virtualhost pertama sobit-one.com
# vi /etc/httpd/conf.d/sobit-one.com.confIsikan dengan script konfig dibawah ini, pemanggilan php 7.4 yang digunakan di definisikan di SetHandler “proxy:unix:/var/opt/remi/php74/run/php-fpm/www.sock|fcgi://localhost”
<VirtualHost *:80>
    ServerName www.sobit-one.com
    ServerAlias sobit-one.com
    #ServerAdmin webmaster@sobit-one.com
    DocumentRoot /var/www/sobit-one.com

    <Directory /var/www/sobit-one.com>
        Options -Indexes +FollowSymLinks
        AllowOverride All
        Require all granted
    </Directory>

    <IfModule !mod_php7.c>
    <FilesMatch \.(php|phar)$>
        SetHandler "proxy:unix:/var/opt/remi/php74/run/php-fpm/www.sock|fcgi://localhost"
    </FilesMatch>
    </IfModule>
</VirtualHost>
buat file konfigurais virtualhost kedua untuk sobit-two.com.
# vi /etc/httpd/conf.d/sobit-two.com.confseting handler php 8.2 dapat dilihat di bagian SetHandler “proxy:unix:/var/opt/remi/php82/run/php-fpm/www.sock|fcgi://localhost”
<VirtualHost *:80>
    ServerName www.sobit-two.com
    ServerAlias sobit-two.com
    #ServerAdmin webmaster@sobit-two.com
    DocumentRoot /var/www/sobit-two.com

    <Directory /var/www/sobit-two.com>
        Options -Indexes +FollowSymLinks
        AllowOverride All
        Require all granted
    </Directory>

    <IfModule !mod_php8.c>
    <FilesMatch \.(php|phar)$>
        SetHandler "proxy:unix:/var/opt/remi/php82/run/php-fpm/www.sock|fcgi://localhost"
    </FilesMatch>
    </IfModule>

</VirtualHost>
Jika sudah selesai check script konfig tidak ada kesalahan syntax dengan perintah dibawah ini.
# apachectl configtest[root@alma9 ~]# apachectl configtest
Syntax OK
Setting policy Selinux unutk direktori yang akan di akses dari luar jaringan agar apache dapat membaca dan menulis.
# semanage fcontext -a -t httpd_sys_rw_content_t "/var/www/sobit-one.com(/.*)?"
# semanage fcontext -a -t httpd_sys_rw_content_t "/var/www/sobit-two.com(/.*)?"
Reload Policy Selinux agar membaca setting terbaru.
# restorecon -Rv /var/www/sobit-one.com/
# restorecon -Rv /var/www/sobit-two.com/
Restart service apache
# systemctl restart httpdHasil Pengujian Melalui Browser
Hasil dari akses file info.php milik domain sobit-one.com versi php-7.4

Hasil dari akses file info.php milik domain sobit-two.com versi php-8.2

Sekian artikel tutorial untuk instalasi Multi PHP dengan Apache web server di OS AlmaLinux9
Kesimpulan
Penggunaan PHP-FPM sangat membantu dalam memanage web server yang menerapkan mutli php. Sselain melaui kofigurasi virtual host sethandler untuk php yang digunakan bisa dipanggil melalui file .htacess